
Manage course tutors
 You can assign other users as co-owners of your resource. These users will then be able to edit and delete the learning resource. Co-owners can add, edit or delete content on their own.
If you want to assign more rights for a course resource to some selected users, but not all the rights of a course owner, you may use right groups to assign partial rights for individual areas.
Add course owners
To add an owner to a course or resource, proceed as follows:
Open "Manage course owners" dialogue
Open the relevant resource and click on the Manage course owners icon in the top right corner of the course view. |
|

1 | The Manage course owners dialogue opens. |
|
2 | Here you can use various search functions to add the desired user(s). In addition to the quick and advanced search, you also have the option to use the Import user list function. | |
3 | The added owner(s) will first be listed in the Invited course owners table. The next time they log in, they will automatically receive a notification message in the news area. Only upon accepting this invitation will they be listed as the owner of the resource and granted the corresponding administrative rights.
|

The invitation will be displayed to potential owners in different places, depending on the interface used.
Where to find the invitation ...
To access your notifications, you have three options:
Option 1: Quick Access | Desktop | Mobile |
|---|---|---|
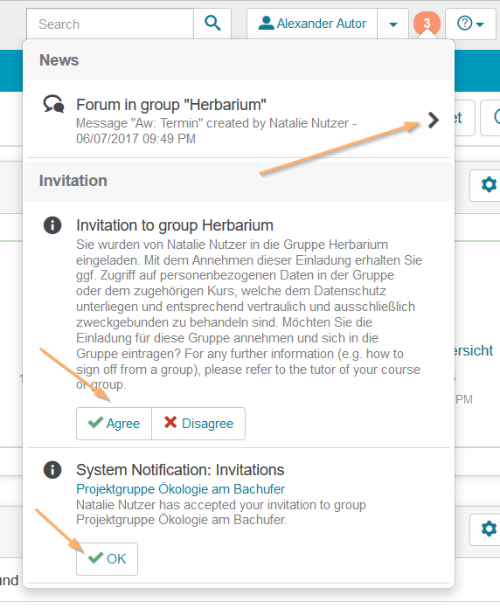
Click on the circle icon next to your user name in the desktop view to open the quick overview of your notifications. |
|
|
An overview opens displaying the latest news and invitations which are stored for you in the system. Click on a news item or on the arrow behind the notification to access the content directly. Some notifications will require action from you. For invitations, for example, the buttons Agree and Disagree will show up. System messages can be marked as read via the OK button. Invitations contain a direct link to the corresponding resource so that you can verify it before confirming the invitation. To close the opened notification area, click again on the circle icon. |
| (There are no differences between the desktop and the mobile view) |


Option 2: News area | Desktop | Mobile | ||||||
|---|---|---|---|---|---|---|---|---|
A larger view of all notifications is available in the area News. To open it, click on the down arrow right next to your name in the header area of the desktop view. Select the entry News from the drop-down list.
|
|
| ||||||
A new News window opens. In the desktop view, you will see several tabs. In the mobile view, you will only see the news.
|
|
|


Option 3: Directly in the course | Desktop | Mobile |
|---|---|---|
If you have been invited as a supervisor, you will receive a notification message immediately after the course opens. Click the ‘Accept’ button at the end of the message to confirm the invitation, or ‘Decline’ to refuse the invitation. You can use the name of the person who invited you to get in touch if you need to discuss matters beforehand. |  |  |
Change order of displayed course owners
With the help of the small arrow icons in the Actions column, you can manually change the order of the course owners. The positioning in the table refers to the order of persons in listings, for instance in the course view, catalogue or search results.


Edit a course owner's visibility
It is not always desirable that users can see all course owners. For example, there may be technical course owners with the right to edit the course and course owners responsible for the course content who should be displayed to learners in the course and search results.
Adjust a course owner's visibility as follows:
Open the relevant resource and click on the Manage course owners icon in the top right corner of the course view. The Manage course owners dialogue opens. |
|
In the Show column, you can set or reset the visibility of course owners by clicking on the eye icon. Users who have been set to "not visible" will no longer be displayed in the course view and list views.
|
|


Remove course owners
To remove a course owner, proceed as follows:
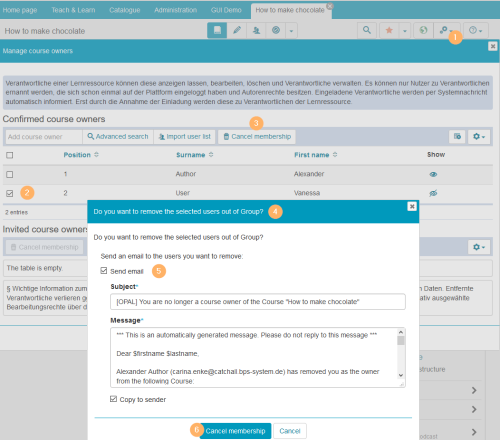
1 | Open the relevant resource and click on the Manage course owners icon in the top right corner of the course view. The Manage course owners dialogue opens. |
|
2 | Select the checkbox next to the corresponding username. | |
3 | Click on the Cancel membership button with the trash can icon in the table header. | |
4 | This opens a dialogue to confirm the action. | |
5 | Optionally, you can also send a message to the corresponding users. | |
6 | Complete the deletion process with Cancel membership. |