
CP Learning Content

Last modified by Carina Enke on 16.01.2024

KB_CP.png The abbreviation CP stands for Content Package. Specifically, it refers to completed learning content (consisting of several pages) with an individual layout and its own navigation. CP learning content pages can easily be created in the learning platform and flexibly edited using a text editor.

A single CP learning content element can replace many course elements of the type Single page in a course.

Information

IMS Content Packaging is a standard for using web-based learning content on various systems. Therefore, you can also use your created CP learning content in other systems that support this format.

Usage: Learners' View

Overview

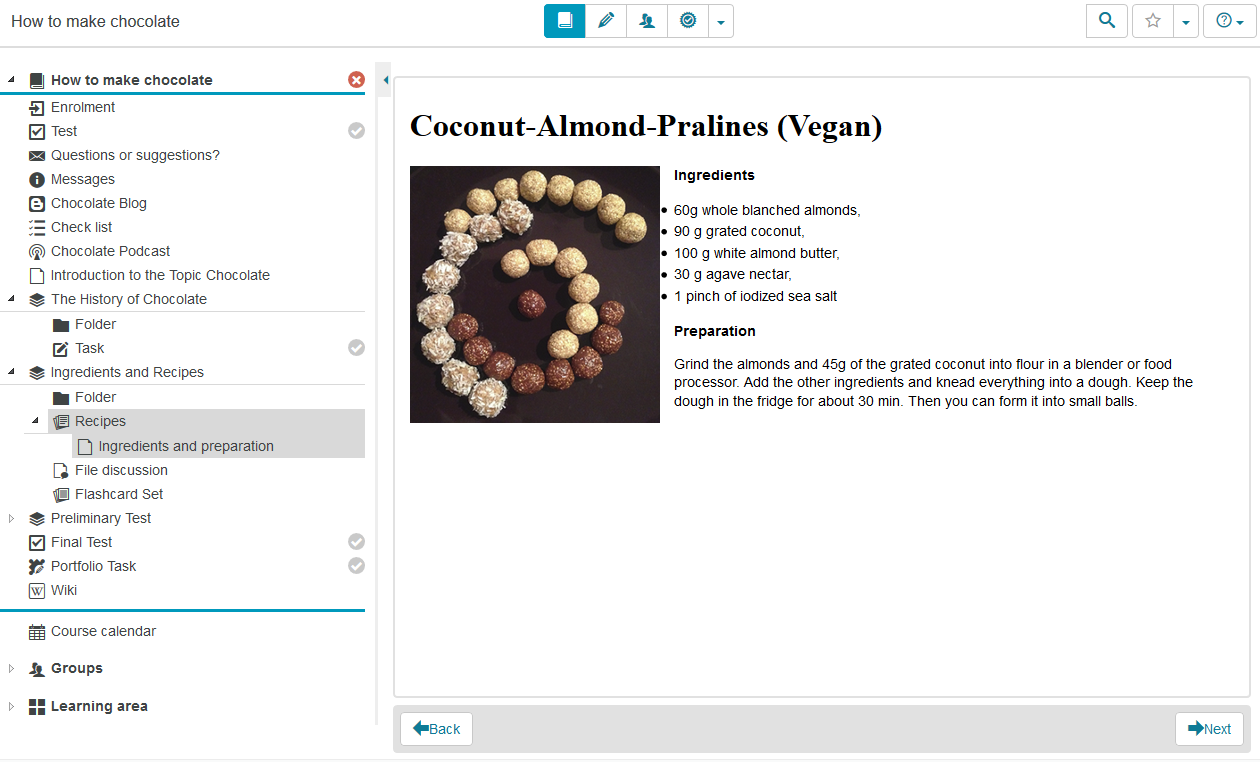
The course element CP Learning Content clearly presents different learning content on individual pages, which can be structured like a book and divided into chapters. To navigate, use the course menu on the left or the buttons Next and Back in the content area.

Kursrun - Beispiel Kursbaustein CP_en.png

Functions for users

The following functions are available to users:

Icon_Zurück_en.png

Icon_Weiter_en.png

Navigation in the CP

  1. Open the course element CP Learning Content in the course.
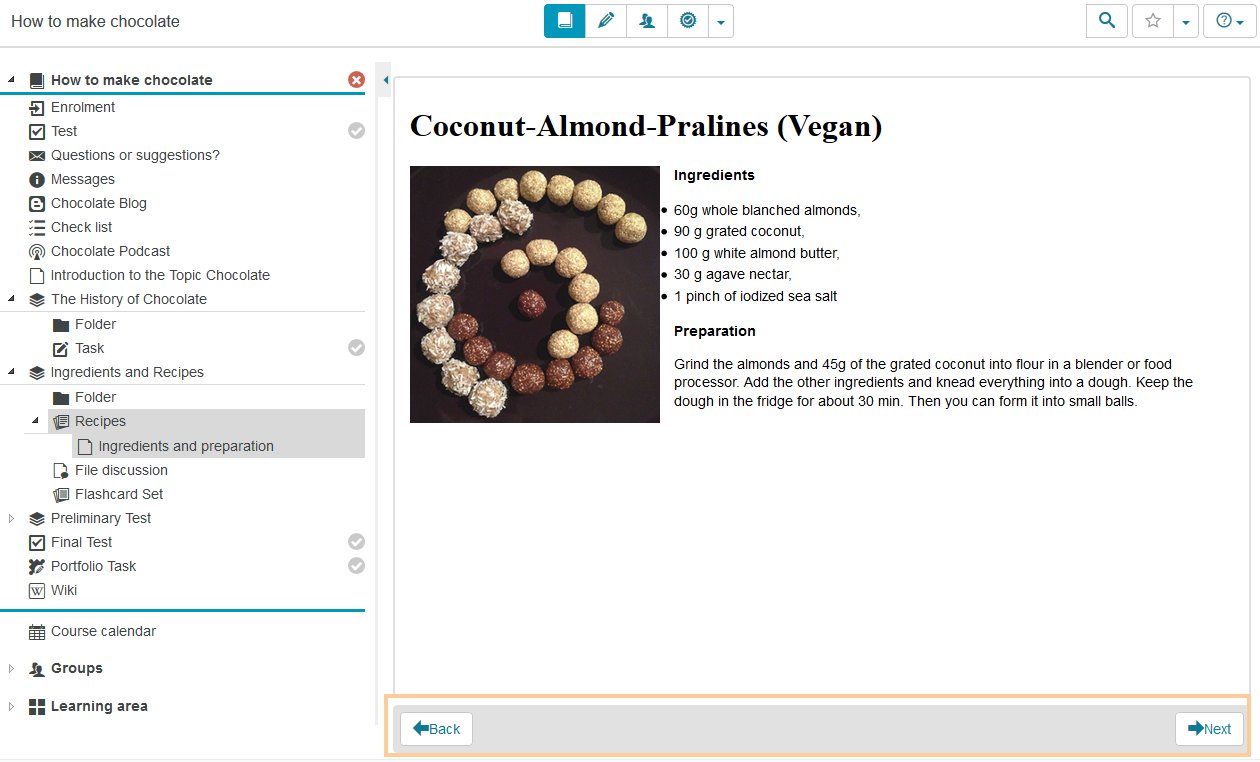
  2. Click the Next button in the bottom right corner to navigate to the next page and the Back button on the left to navigate to the previous page.
Information

If you are on the first page of the course element CP learning content, the Back button will be greyed out. If you are on the last page of the course element CP learning content, the Next button will be greyed out.


Kursrun - Navigation im CP-Lerninhalt_en.png

Configuration: Authors' View

In the course editor

The following functions are available in the course editor:

Add a course element CP learning content

Click to open instructions on how to add a course element ...

To integrate a course element into your course, proceed as follows:

1

Open the course you want to edit.

Use the pencil icon at the top of the page to open the editing mode.

Kurs-zum Editor wechseln_en.png

2

Select the course element you require by clicking on it from the list of available course elements in the menu on the right-hand side.

Kurseditor-KB auswählen_en.png

3

In the dialog box, you can define the position of the new course element within your course structure (left navigation pane). The available positions are marked with an insert icon.

To insert the new course element into an existing sub-structure, you must first open it by clicking on the small triangle icon next to the structure's title. The area will open, and you will again see insert icons at the available positions.

Click on the insert icon at the desired position within the structure. The selected area will be highlighted.

Confirm your choice with Insert course element.

Kurseditor-KB in tree einfügen_en.png

4

The element will be inserted into the course structure at the selected position.

Depending on the course element, you have to make additional configurations or add content in order to complete the configuration.

For these changes to take effect, you must publish the course. The course element will then also become available in the course view.

Kurseditor-KB konfigurieren_en.png


General configuration settings

In the course editor, you will find the following configuration tabs:

Title and description

Configuration options in the tab title and description ...
VisibilityIf necessary, restrict the visibility of the course element here. For more information, see the Visibility help page.
Access If necessary, restrict the visibility of the course element here. For more information, see the Access help page.

Learning content

In this tab, you can select, create, and import resources. Detailed instructions are given in the following section Special configuration settings.

Multilingualism

In this tab, different translations can be added to individual course element areas.

Special configuration settings

In the Configuration tab, you can assign a resource of the type CP Learning Content to your course element and specify display options.

Select CP learning content

To assign the course element a CP resource, you can:

  • use an existing CP Learning Content resource (option 1),
  • create and use a new CP Learning Content resource (option 2), or
  • import a new CP Learning Content resource (option 3)
Start the configuration for all three variants as follows:

1.

Open the course element CP Learning Content.

Switch to the Learning content tab in the course editor and click on Select, create or import CP learning content.

Kurseditor - CP-Lernressource wählen, erstellen oder importieren_en.png

2.

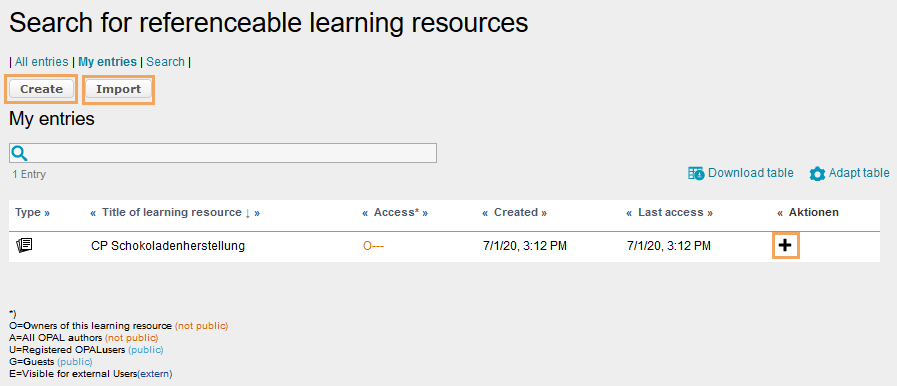
A page with functions to Create and Import new resources and a list of your existing CP resources will open. 

Decide on one of the following options:  

Kurseditor - CP-Lerninhalt drei Optionen_en.png

3a.

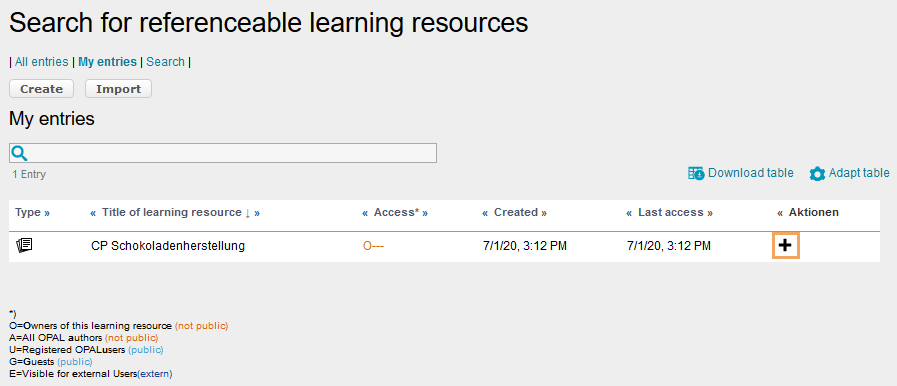
(Option 1:) To use an existing CP Learning Content learning resource, click on the Icon_Hinzufügen schwarz.png plus icon next to the desired resource in the Actions column.

Kurseditor - CP-Lernressource wählen_en.png

3b.

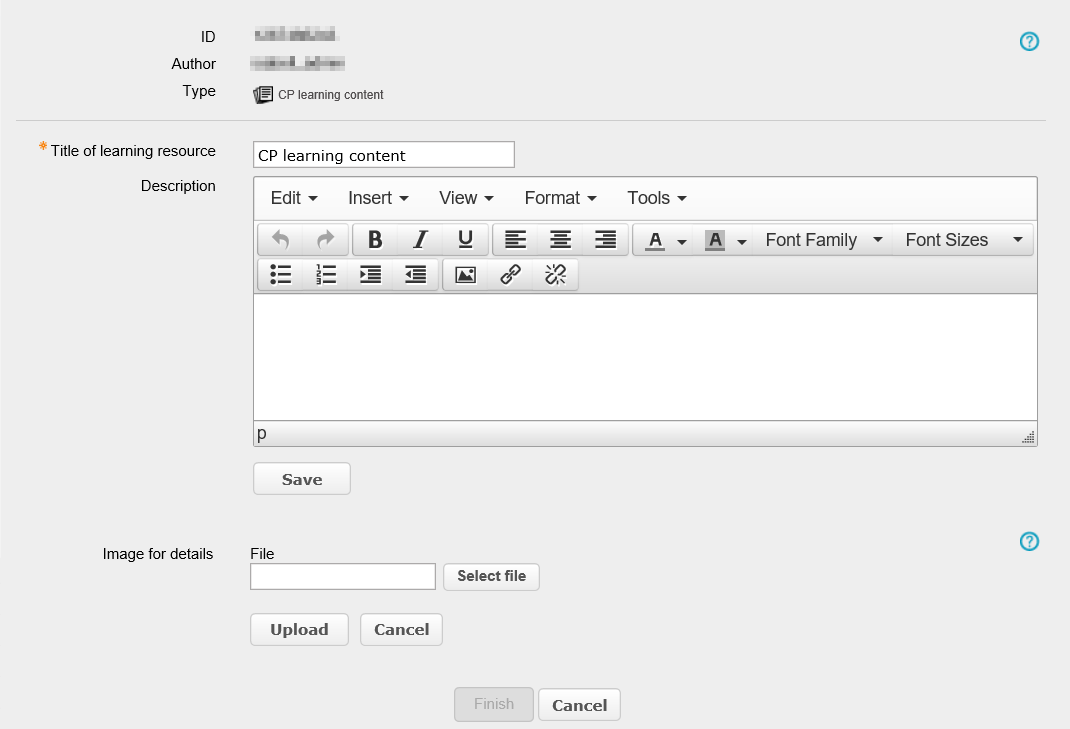
(Option 2:) To create and use a new CP Learning Content learning resource, click on Create. A page for creating a new learning resource will open.

Expand further steps ...
  • Enter a title for the new resource and add a description if necessary.
  • Click on Save.
  • As a next step, you can add an image to the resource using Upload.
  • Click on Finish to complete the creation process.

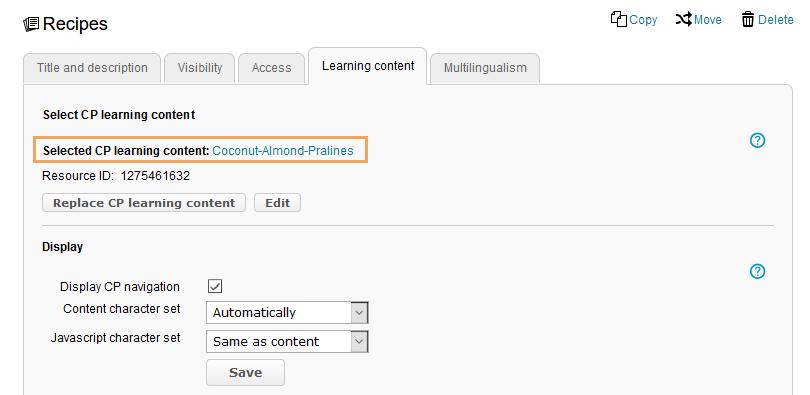
The newly created resource will now automatically be used as a resource for the CP learning content course element and displayed under Selected CP learning content.

Lernressource -  CP-Lerninhalt erstellen_en.png

3c.

(Option 3:) To import a new CP Learning Content learning resource, click on Import. The system's default upload page will open.

Expand further steps ...

Select a location for the file you wish to import and upload the file.

  • The page for creating a new learning resource will open.
  • Enter a title for the imported resource and add a description if necessary.
  • Click on Save.
  • As a next step, you can add an image to the resource using Upload.
  • Click on Finish to complete the creation process.

The newly imported resource will now automatically be used as a resource for the CP learning content course element and displayed under Selected CP learning content.

Kurseditor - CP-Lernressource importieren_en.png

4.

5.

The selected resource will be displayed under Selected CP learning content.

Publish your course to complete the configuration and to make the resource available to participants.

Kurseditor - gewählter CP-Lerninhalt_en.png

Information

You can replace the integrated CP Learning Content resource at any time.

Functions after adding a CP learning content resource  

Once a CP learning content resource has been added, you have the following options:

Replace CP learning content

The Replace CP learning content option allows you to select another learning resource or to create or import a new learning resource.

Detailed instructions can be found in the section Special configuration settings.

Edit

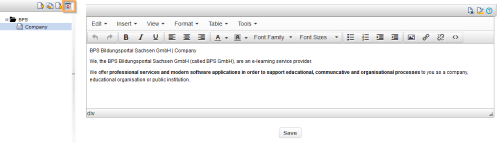
Use this button to switch to the edit view of the resource. Here you can create new pages and edit, copy, import, or delete existing pages.

Delete CP page ...

To delete a CP page, proceed as follows:

Select the element you wish to delete and click on the delete page icon.

Kursbaustein CP-Lerninhalt - Symbol Seite löschen_en.png

Now you have the following options:

  • Delete menu element and files: Clicking this button will delete the menu element as well as all of its existing files.
  • Delete menu element only: Clicking this button will only delete the relevant menu element. The files in the menu will be retained.

Kursbaustein CP-Lerninhalt - Möglichkeiten Löschen_en.png

Information

A learning resource of the type CP Learning Content is not an independent learning resource, i.e. it must be integrated into a course element CP Learning Content. Further information on independent learning resources as well as tutorials on their creation and management are provided in the section Learning resources.

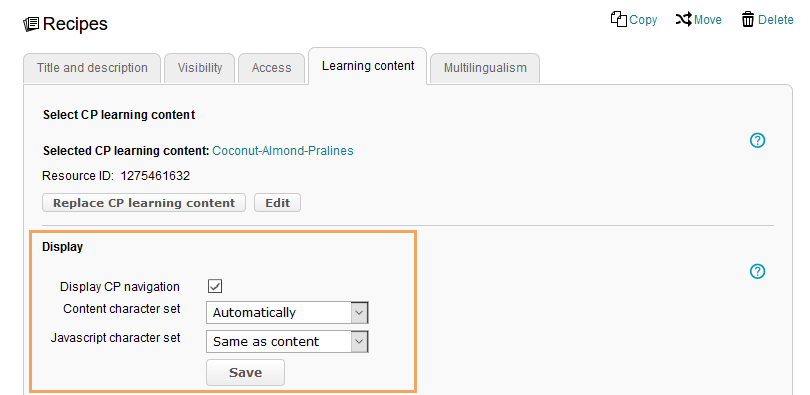
Display

You can customise the following display options:

  • Display CP navigation: With this checkbox, you can determine whether the navigation of your content package will be displayed within the course navigation.
  • Content character set: The system attempts to automatically detect the character set. However, if the Automatically option does not result in the desired display, you can configure the coding of the content using a predefined character set (if there is no coding, the character set ISO-8899-1 will be used by default).
  • JavaScript character set: Allows to encode the JavaScript code using a predefined character set (the same character set will be used by default for both content and JavaScript).

Kurseditor - CP-Lerninhalt Darstellung_en.png

In the course view

In the course view of a course element CP Learning Content, you have access to all functions available to users.