

Set Options
Use the various configuration options in the tab Options to adapt questions according to your needs.

Attempts
You can allow learners to answer individual questions multiple times. During the test, your students will see the number of attempts available for each question. They can submit their answer and, if further attempts are possible, answer the same question again.

In the ONYX Editor, you can decide whether the settings for the number of available attempts should be applied to the entire test or only to selected sections or individual questions.
To do this, go to the Options tab to define your preferred settings:
| If you, for example, set the maximum number of attempts to find a solution to 2, the learner can answer each question in the test twice. |  |
If you wish to set the number of attempts individually for specific sections or questions, disable the option Apply the configuration of the superior element. Now, you can set the number of attempts individually for the section or question. The default is always one attempt. To allow an unlimited number of attempts, enter 0 in the input field. | 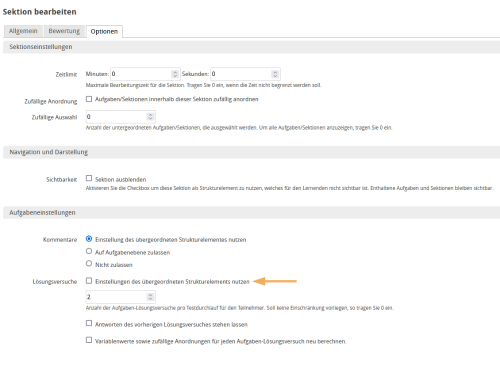 |
| Once a new attempt is started, the previous answer entry is cleared. If you want to give participants the option to modify their answer based on their latest response, activate the option Keep answers from previous attempts. |  |
| If your task has variables, you can use the option Recalculate variable values and random arrangements for each task attempt to specify whether a new attempt should be made based on new initial values. |
Darstellung
Input fields for text entry interactions are generally displayed as input boxes. However, in questions in which, for example, parts of words are to be completed, a line is more common as a representation for the part to be completed.
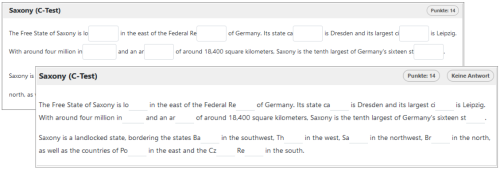
Activate the Display input field as line checkbox to display a line instead of the input box in the test procedure, evaluation and PDF formats. Thus, a display without spacing to the text and without any line breaks is possible.
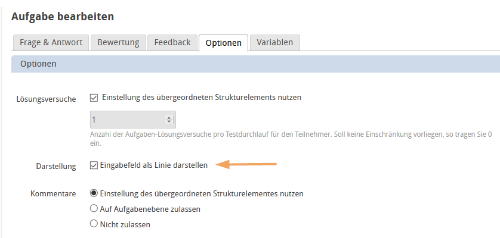
This setting is available for all questions of the type “text entry interaction” (Text Entry Interaction, Numerical Input Interaction, Calculation Interaction, Formula Comparison, Regular Expression). If you enable it in a question, it applies to all gaps in it.
Zufällige Anordnung
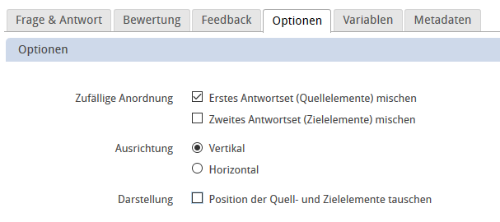
Standardmäßig wird für die meisten Aufgabenformen die Anordnung der Antworten zufällig ermittelt. Somit erscheint die Aufgabe für verschiedene Testteilnehmer und Testversuche anders. Für einige Fragestellungen kann es jedoch erwünscht sein, dass die Antworten nicht frei gemischt werden. Für diese Fälle kann die Zufällige Anordnung im Tab Optionen deaktiviert werden.

Für Zuordnungsaufgaben kann darüber hinaus auch nur eines der Antwortsets, durch Deaktivierung der zufälligen Anordnung pro Antwortset, festgestellt werden.

Ausrichtung und Anordnung
Standardmäßig werden für die meisten Aufgabenformen die Antworten vertikal und damit untereinander ausgerichtet. Über die Konfiguration der Ausrichtung ist es möglich die Antworten horizontal anzuordnen. Von einer horizontalen Ausrichtung wird insbesondere bei einer größeren Anzahl von Antwortelementen aus optischen Gründen abgeraten. Für die Durchführung von Testinhalten auf mobilen Endgeräten, insbesondere Smartphones, kann die horizontale Ausrichtung die einfache Bedienbarkeit des Tests einschränken.

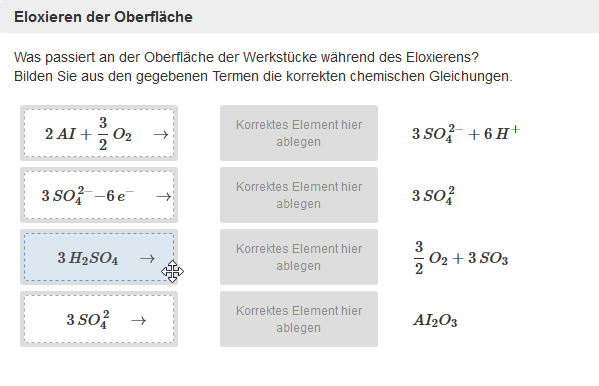
Für Zuordnungsaufgaben steht neben der Konfiguration der horizontalen und vertikalen Ausrichtung auch die Darstellungsoption zum Tauschen der Position von Quell- und Zielelementen zur Verfügung. Dies ermöglicht die Umsetzung konkreter Fachinhalte, beispielsweise von mathematischen oder chemischen Gleichungen. Ist der Anfang der Gleichung gegeben und das korrekte Gleichungsende bzw. die Lösung soll durch den Teilnehmer zugeordnet werden, empfiehlt es sich die Konfiguration Position der Quell- und Zielelemente tauschen zu aktivieren.
Standardmäßig werden die Quellelemente durch den Teilnehmer zugeordnet. Er sortiert von links nach rechts. Für eine Gleichung wird durch den Teilnehmer dadurch immer der linke Ausgangsterm dem rechten Zielterm zugeordnet. |
|
|
Durch Aktivierung der Option Position der Quell- und Zielelemente tauschen werden die Zielelemente durch den Teilnehmer zugeordnet. Es ergibt sich die Möglichkeit, dem Teilnehmer für eine Gleichung den linken Ausgangsterm vorzugeben und den rechten Zielterm zuordnen zu lassen. |
|
|


Comments allow the participant to leave feedback on a question for the test evaluator. Especially in the case of closed question forms with limited response options, the comment function offers a valuable support possibility for participants, e.g. if they do not understand the question, perceive it as inaccurate, or do not find their solution in the answers provided to them.
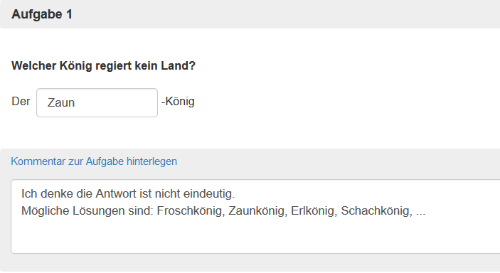
In the ONYX Editor, you can decide whether the comment settings are supposed to be applied to the entire test or only to selected sections or individual questions.
The tutor can view the comments in the participant's results view. Further information are provided in the help section Results view: View participant.
Kommentare in einer Aufgabe verwenden | Um die Kommentarfunktion für eine Aufgabe zu verwenden, gehen Sie bitte wie folgt vor:
|
Erweiterte-Einstellungen
External File
You can enhance or customise your questions and tests with additional files.
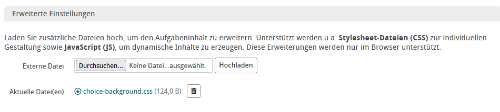
Layout adjustments by using a style sheet file (CSS)
In order to use this function, you need to have a basic knowledge of HTML and CSS. Save your layout file as a CSS file (.css) and upload it to the Options tab of your question or test. Use the preview to verify whether it will be properly displayed. You can remove the layout file at any time or upload a new one.
Beispiele zum Einsatz einer Layout-Datei für ONYX-Testaufgaben sind: